SmartLED Shield and Breakout
General Information
Section titled “General Information”The SmartLED Shield for the Teensy 4 is used as the backbone to this design, this allows you to use open-source code to be easy to implement if you decide against using ProtoTracer to display graphics on your Protogen!
The following information is pulled directly from their Crowd Supply page as a means of maintaining a local copy in case they take the posting down: SmartLED Shield on Crowd Supply
Easy-to-implement LED Graphics
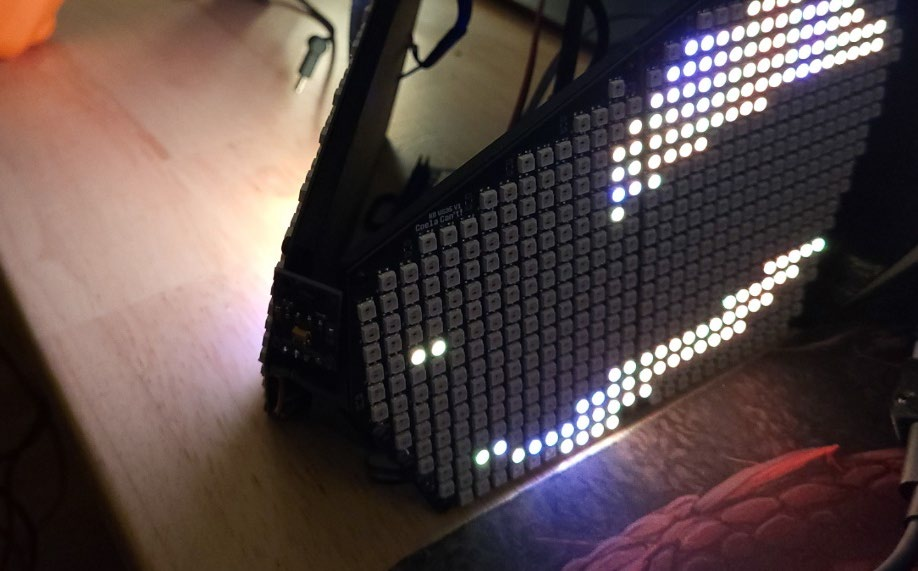
Section titled “Easy-to-implement LED Graphics”SmartLED Shield enables the Teensy 4 to drive high-quality graphics to HUB75 RGB LED panels, with 36-bit color and 240 Hz refresh rate across large panels (e.g. 128x64 pixels). A Teensy 4.0 or Teensy 4.1 with pins fits into the socket on the shield, and the shield can attach directly to the HUB75 panel or through a ribbon cable. The SmartMatrix library for Arduino makes it easy to draw basic graphics, create scrolling and static text, draw beautiful patterns using FastLED, and play animated GIFs on the panel. Example code is provided so you can get started as quickly as possible. The Shield and library use special features and peripherals of the Teensy 4 processor to send graphics data to your display with minimal CPU usage, so you can use the processor to do other tasks in parallel such as SPI communication, file decoding, or complex rendering.
Using SmartLED Shield with SmartMatrix library and the Teensy 4 is the easiest way to drive high-quality and high pixel count graphics to RGB LED panels with a microcontroller. Use a simple API to tell the library what to draw on the screen, and the library takes care of refreshing in the background. Advanced features like these are enabled automatically:
- 36-bit Color Refresh - See the full color range in the image or pattern you’re displaying, with no noticeable brightness steps when dimming pixels down to black. Up to 48-bit color refresh is available.
- Color (Gamma) Correction - Your source graphics are probably 24-bit color, but SmartMatrix library applies automatic color correction so they have good contrast, smooth gradients, and don’t look washed out.
- Global Brightness Control - When you don’t need the full brightness of the LED panel, lower the brightness without having to sacrifice color depth of your graphics.
The shield is easy to assemble and connect to a panel, and there’s no soldering required beyond adding pins to the Teensy. The Teensy is removable, so you can swap between the 4.0 and 4.1 if you want. All long edge Teensy signals are brought out to expansion rows for easy prototyping.
Features
Section titled “Features”Ease-of-use:
- SmartLED Shield is fully assembled. If your Teensy has pins, then no soldering is required.
- Teensy can easily be inserted into and removed from the shield.
- SmartMatrix library for Arduino provides an easy development platform, along with others such as FastLED.
- Example code is included for a quick start.
Flexibility:
- Drives displays with up 9k pixels (e.g. 96 x 96) with high quality settings, and even larger displays with reduced quality settings.
- Signals on the long edges of the Teensy are brought out to expansion rows for easy prototyping.
- The 4-pin JST-SM connector may be used to provide power to the Teensy separate from the USB connector.
- Optionally drive DotStar/APA102-compatible LEDs using the onboard 5 volt buffers and 4-pin JST-SM connector. Mating JST-SM cable is included.
- Panels can be daisy-chained to make large, bright, high-resolution displays.
- Drives all 14 signals on HUB75 panels using 5 volt buffered outputs, using only 9 GPIO pins on the Teensy 4.0 or 4.1.
Quality:
- Provides up to a 240 Hz refresh rate.
- Up to 48-bit color refresh is available.
- Color (gamma) correction, and global brightness control features allow for a high level of visual quality control.
HUB75 Panels
Section titled “HUB75 Panels”HUB75 RGB panels are typically used for LED billboards (e.g., Times Square), making them cost-effective and readily available. They’re much cheaper per-pixel than addressable LEDs, and available in a wide range of pixel pitch (as of now, 2 mm spacing up to 10 mm spacing per LED). They do require an external controller to continually send data to the panels to refresh them line by line, and that’s where the SmartLED Shield and SmartMatrix library come in. Adafruit, Sparkfun, and other distributors carry panels that are known to be compatible with SmartLED Shield and the SmartMatrix library, but most panels on AliExpress and other sources are compatible as well.
The pixel pitch and “RGB” are good search terms on Aliexpress, e.g. “P6 RGB” for a 6 mm pitch RGB HUB75 panel.
Teensy
Section titled “Teensy”Teensys are small, well-featured, low-cost microcontroller boards designed by PJRC. Best of all, the boards have excellent development support and a large community. They’re the perfect solution to build an LED board around.
SmartLED Shield works with two variants of Teensy 4, the 4.0 and 4.1, with the 4.1 being the higher-powered option. Teensy units are available for purchase along with shields during the campaign. Please note that SmartLED Shield kits come with headers required to mate your Teensy to the board, but if you buy a Teensy through the campaign, you will need to solder the Teensy headers yourself. Units with pre-soldered headers can be found on Sparkfun.
As stated on the PJRC website, these are the main differences between the two units:
| Feature | Teensy 4.1 | Teensy 4.0 |
|---|---|---|
| Ethernet | 10 / 100 Mbit DP83825 PHY (6 pins) | None |
| USB Host | 5 Pins with power management | 2 SMT Pads |
| SDIO (4-bit data) | Micro SD Socket | 8 SMT Pads |
| PWM Pins | 35 | 31 |
| Analog Inputs | 18 | 14 |
| Serial Ports | 8 | 7 |
| Flash Memory | 8 Mbyte | 2 Mbyte |
| QSPI Memory | 2 chips Plus Program Memory | Program memory only |
| Breadboard Friendly I/O | 42 | 24 |
| Bottom SMT Pad Signals | 7 | 16 |
| SD Card Signals | 6 | 0 |
| Total I/O Pins | 55 | 40 |
Teensy Pin Usage
Section titled “Teensy Pin Usage”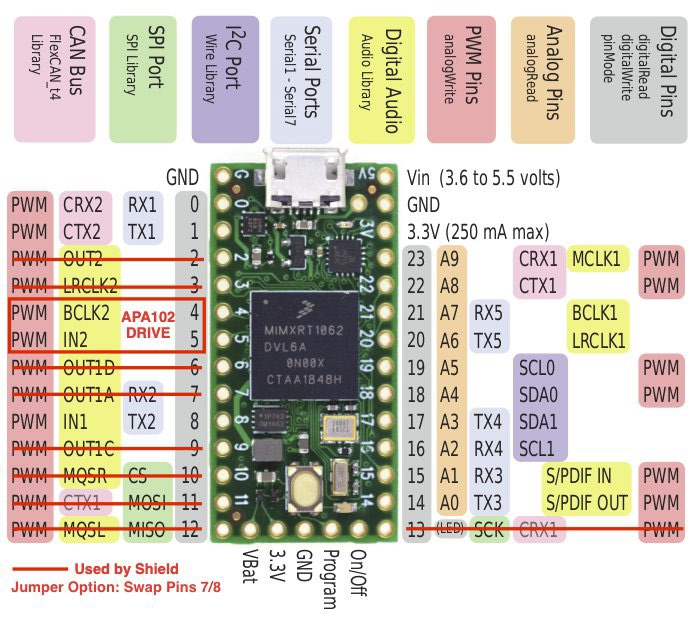
The additional pins on the right – 14 to VIN - are used to provide the additional functionality to the controller breakout.
Documentation
Section titled “Documentation”- SmartMatrix library 4 GitHub: https://github.com/pixelmatix/SmartMatrix/
- SmartLED Shield for Teensy 4 Documentation: http://docs.pixelmatix.com/SmartMatrix/shield-t4.html
Controller Breakout
Section titled “Controller Breakout”Information
Section titled “Information”The controller breakout provides sensor connectivity, power distribution, and indication methods for power.
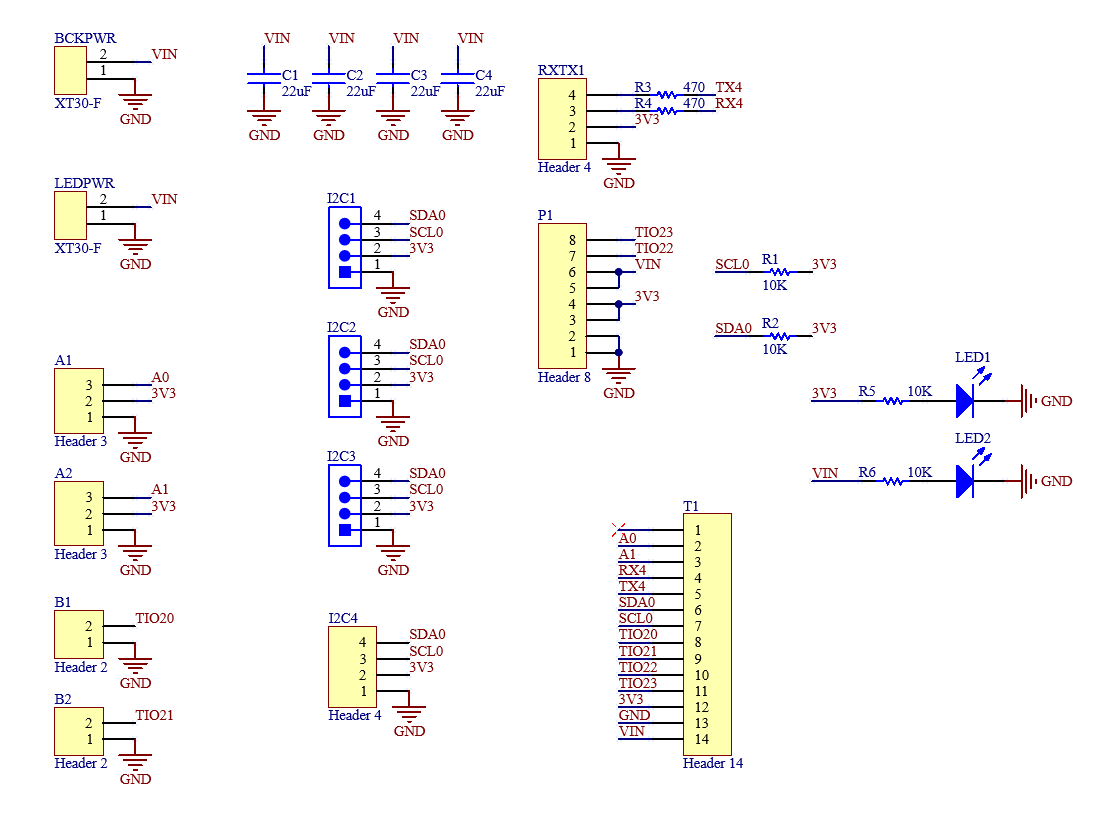
Schematic
Section titled “Schematic”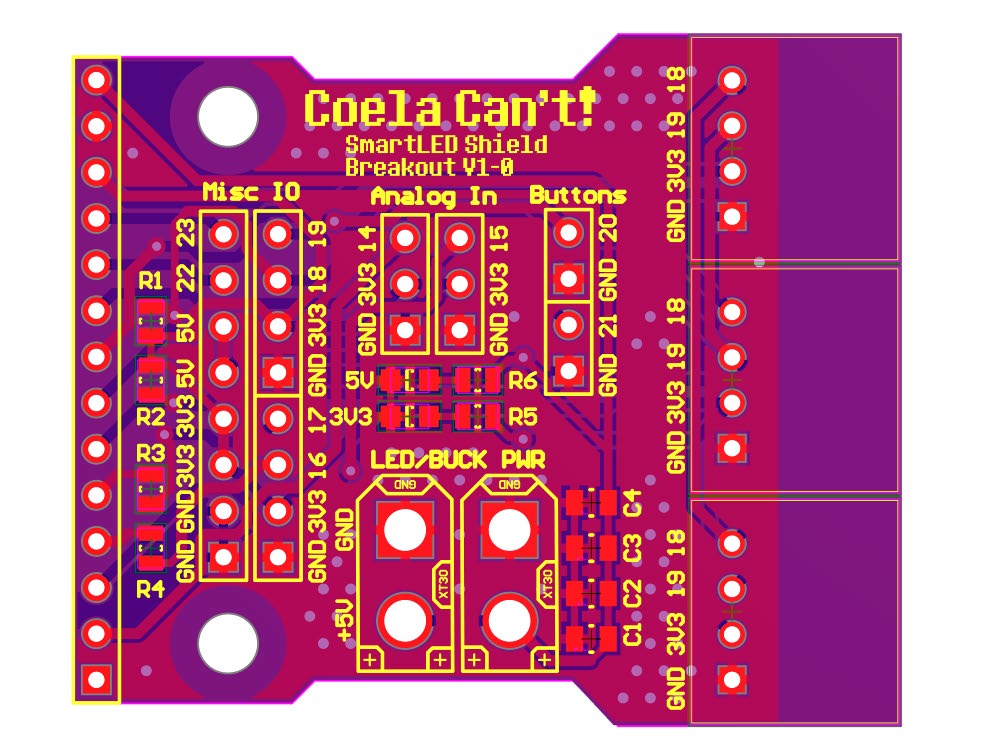
Full PCB Design
Section titled “Full PCB Design”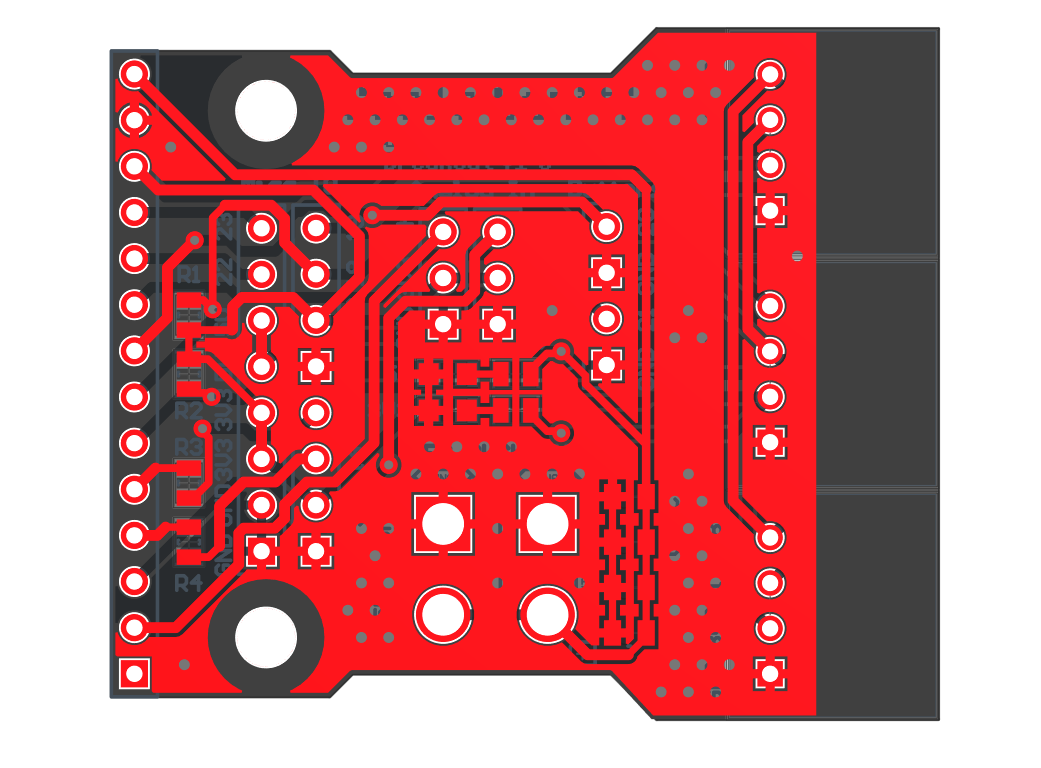
Top Layer PCB Design
Section titled “Top Layer PCB Design”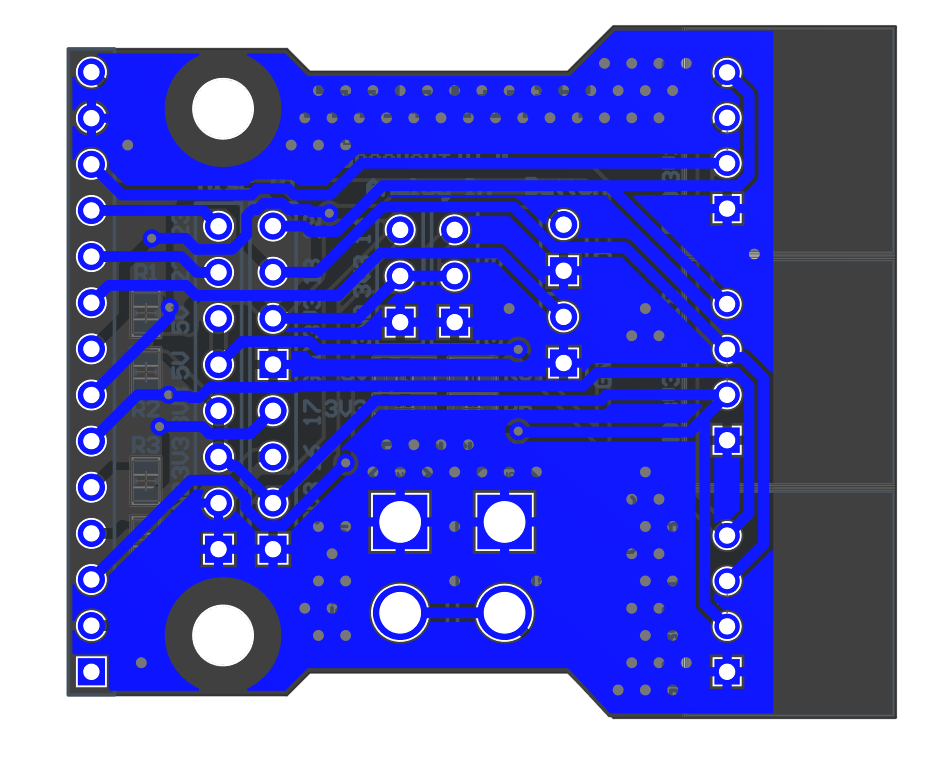
Bottom Layer PCB Design
Section titled “Bottom Layer PCB Design”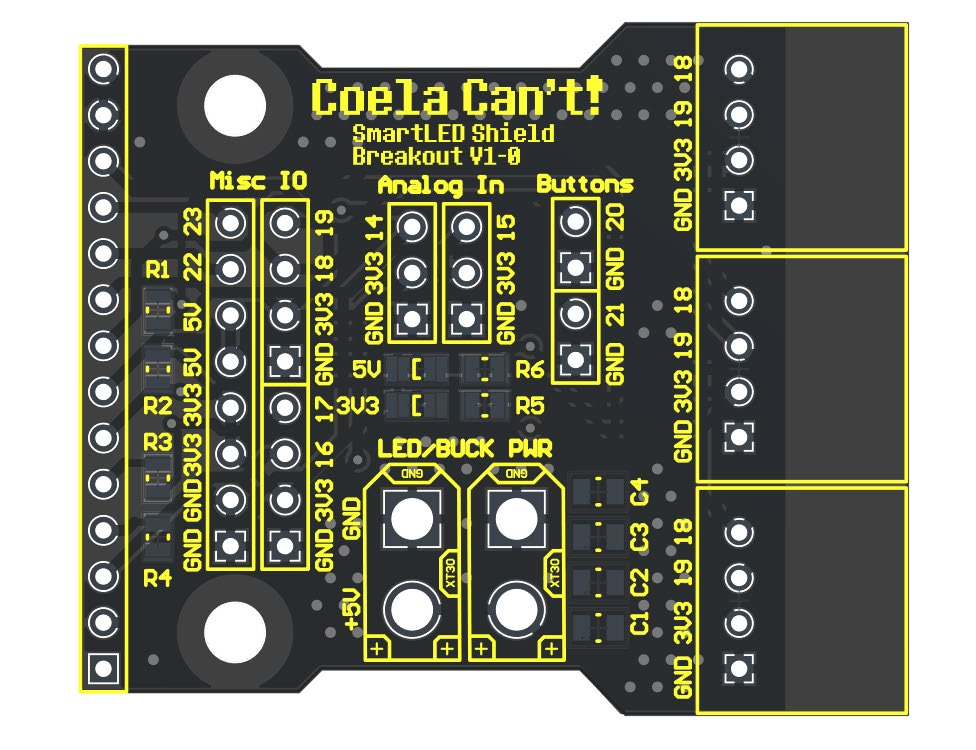
Controller Breakout Schematic Breakdown
Section titled “Controller Breakout Schematic Breakdown”The schematic breakdown details the pin header connections and power distribution. See the schematic above for full details.
Indicators
Section titled “Indicators”There are two in-use visual indicators on the controller. The bottom LED indicates that the board’s 3.3V supply is powered. The top LED indicates that the board’s 5V supply is powered.
Power Setup
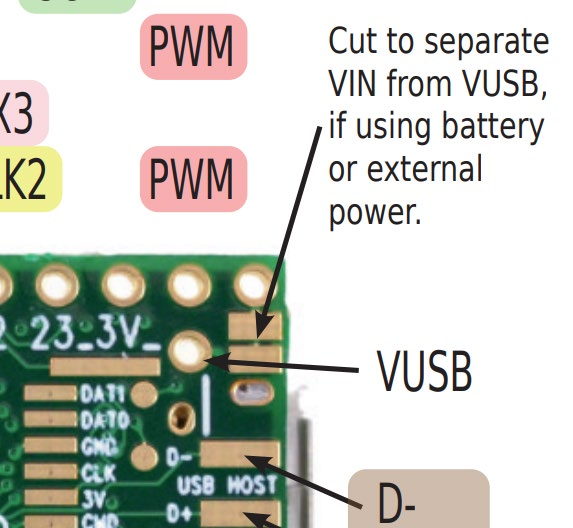
Section titled “Power Setup”Powering the Teensy 4.0 for Programming
Section titled “Powering the Teensy 4.0 for Programming”For programming the Teensy 4.0, the bottom VIN from VUSB trace needs to be cut as to not provide power to the LED boards and cause damage while programming.
Powering the Controller for Usage
Section titled “Powering the Controller for Usage”To use the controller, 5V must be provided to the XT30 connector, make sure you follow the standards for the XT30 polarity!